For a number of years now Greg and I have been talking about designing and building planes for sale. On those long slope safari trips we’d go over what we’d want to see in a plane. Greg’s got a lot of great ideas which are top secret right now 😉 One thing that was paramount was we weren’t going to sell anything that we didn’t like flying ourselves.
Then a couple months ago an opportunity presented it self in the form of the Brian McLean Vector2. Greg called me up and said he’d found a plane that fit’s what he was looking for. Great flyer, sleek lines, super reputation and a twisty wing ta boot. Well, sign me up!…Greg is a great pilot and if he says “this is the one”…well, I got to believe him.
Brian McLean produces kits for the Vector2. It includes the wing cores, the fiddly bits for the wing mechanism, a superb glass fuse and a molded carbon rudder. Everything in the kit is of the highest quality and finish. Looking over the plans I broke it down into building the wings and everything else.;-) So let’s start with the wings.
The wing cores are cut from surfboard foam. This stuff is dense! I mean solid! These will make a very nice wing. The two panels per side fit together with only a minimum amount of sanding required. Following the plans, I made some cuts in the root for the wing rod and actuator pin. Then attached the root rib. A little more sanding and were ready for bagging.
Most of the wing’s I’ve made have been for DLG’s so making this wing used a LOT more epoxy than what I was used too. A full carbon skin can really soak up the epoxy! Everything’s ready and into the bag it goes. 24 hours later the Mylars come off and I stand back and admire carbon goodness.
Now for the fuselage. Brian’s done an excellent job molding the fuse. There’s plenty of room inside, pre-drilled holes for the wings and stab and a superb finish outside. The rudder fin is molded as part of the fuse so that is the reference for setting the wings and stab.
This is a wingeron so there’s one servo moving the wings. It sits in front of the wing rod and actuates two cams that pivot on the wing rod. The cams are pre assembled and the other bit’s that make up the mechanism are pre cut ready to be installed. Setting the wing servo takes some careful planning. The links connecting to the cams are quite short and need to be positioned correctly to ensure proper movement of the wing. The fuse has marks molded into it showing where to set the wing neutral position. It’s a full flying stab so it’s not SO critical to get the wings exactly on the marks, but it puts the fuse in a pleasing orientation while flying (tail high not low).
The stab mechanism is glued into the fin then the rudder is installed. Trays are glued in for their servos and the linkages are connected. Everything is tested and we’re ready to fly.
I was able to finish building the plane just a week before we headed out to South Dakota for several days of uninterrupted flying. South Dakota is a great place to maiden new planes. Nothing to hit out there.
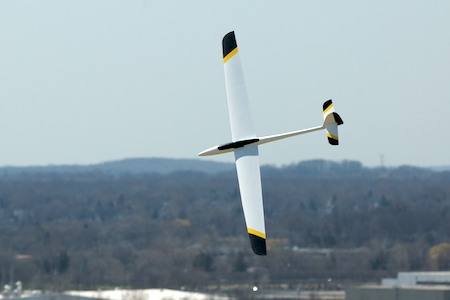
This was the first time Greg had seen the plane all put together. We set it up in the hotel parking lot to check the throws. Everything looked good so we headed out to the hill. The winds were maybe 10 – 15mph. We had about a dozen guys flying all sorts of craft, most were having success. I handed Greg the radio and stepped up to the lip. A wiggle of the sticks to confirm it was on and a nod from Greg, then I gave it a firm toss….SUCCESS!! A few clicks of trim and it was FLYING!
Greg worked it back and forth a few times getting a feel for it. It looked great in the air! The fuse has a sexy shape and I set it up so it has a tail high attitude so it looks like its going fast! He gained some height and did a short dive followed by the smoothest axial roll you’ve ever seen. A quick roll inverted showed we could take a little weight out of the nose. He brought it around and landed on the top. We had thought this plane would land hot, but it slowed down nicely and settled down into the short grass.
Now it’s my turn! Greg gives it a heave and I fly off into the sky. A left turn then start working the lift to gain altitude. The wind wasn’t what I call rippin’. It’s enough to keep it in the air plus a little more. What surprised me is the way this plane effortlessly responded to the lift. It seemed to fly like it was lighter that it was. It’s not overweight by any means, at 49oz, but I just didn’t expect it to do as well as it was. I was as high as the wind would take me so I put it in a dive and pulled up into a loop. It tracked through the loop like it was on rails! At the bottom of the loop I pulled up and gained almost all my altitude back! This thing is going to be a favorite. Some fast runs along the top of the hill showed that this plane is silent! With no servos sticking out of the wing there’s nothing to make noise. It’s almost eerie.
A few more rolls and loops and I setup for a landing. Come around from behind and line it up…It wasn’t as pretty as Greg’s landing but it was level and settled into the grass just fine.
This is going to be a fantastic plane to have in your quiver. Like I said, Brian offers the kits but unless you’re an experienced builder it might not be the kit to start with. Properly built, this plane will perform beyond all expectations.